Adding Search with Algolia
This guide will run you through the process of setting up a custom search experience powered by Algolia on a Gatsby site.
What is Algolia?
Algolia is a site search hosting platform and API that provides you with the components you need to build powerful search functionality without setting up your own server.
Algolia will host the search index. You tell it what pages you have, where they are and how to navigate them, and the Algolia API will return those results to the user based on whatever search terms they use.
Algolia provides a free tier that offers a limited number of monthly searches. A paid plan is required for higher volumes.
Indexing and searching
There are two stages to providing search functionality: indexing your pages and building a search interface for users to query the index.
The Gatsby Algolia plugin handles the indexing. It sends your pages to Algolia for indexing every time you run gatsby build. You use GraphQL to customize which pages and what information to index.
To build the user interface for searching, this guide will use React InstantSearch, which is a library provided by Algolia with ready-made React components. This is the quickest way to get up and running, but you could also build your own custom user interface.
Note: If you want to build a search for technical documentation, Algolia provides a product called DocSearch that simplifies the process further and eliminates the need for manual indexing. This is the preferred approach for documentation sites.
Setting up the project
This guide will set up a search based on the Gatsby starter blog. You can base it on your own project instead, but that might require minor modifications to the code, depending on your page structure and the frameworks you use.
Create a new site using
The starter blog contains the pages you will index in the directory content/blog. These are Markdown files that have the frontmatter field title. It is referenced when configuring the Algolia query. If you call this field something else, the query needs to be modified.
Indexing
Now that you have a project set up you can proceed to indexing your pages in Algolia.
Start by adding the Algolia plugin:
Configuring the Algolia plugin
You will need to provide some information that identifies your account to the Algolia plugin and authorizes it to write data to it.
If you don’t already have an Algolia account, create one. There is a free trial that does not require a credit card.
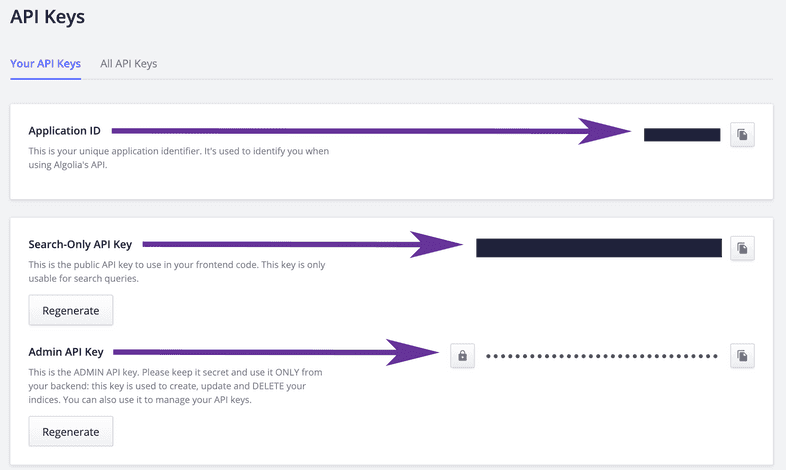
Then, go to the ‘API Keys’ section of your Algolia profile. It should look like this screenshot, only with letters and numbers instead of black boxes:
Copy out the Application ID, Search-Only API Key, and Admin API Key from Algolia and create a file called .env in the root of your project (gatsby-algolia-guide if created as described above). This file contains your project environment variables. Replace the placeholders with your copied values:
Note that the value of the Admin Key must be kept secret, since it allows write access to your index. It must therefore not be included in any code you ship.
It is also best practice not to check in the .env file for this reason. Consider creating an .env.example without the values to git instead. This way, if someone else sets up the project, they know what configuration they need to supply but don’t have access to your private values.
Next, modify gatsby-config.js to read the configuration and add the gatsby-plugin-algolia plugin.
Add the following line at the top of gatsby-config.js to read the configuration from .env:
Then add the configuration for gatsby-plugin-algolia to the list of plugins in the gatsby-config.js. dotenv makes the configuration values available as keys in process.env.
Query the pages for indexing
You still need to supply a queries configuration. Queries tell the Algolia plugin what data is to be indexed. They perform GraphQL queries for the relevant pages and convert the response into a set of Algolia records. These contain key/value pairs with the data to be indexed.
The configuration could have been entered straight into the gatsby-config.js, but the configuration above loads it from a new file src/utils/algolia-queries.js to avoid clutter. Create this page in your project:
If you did not start from the Gatsby start blog, you might need to modify the pagePath to match where your content is kept.
The file exports a list of queries. Each query defines a single index. You can build multiple indices with Algolia but this guide will only use a single one.
Each index requires a GraphQL query that retrieves the pages and data to be indexed. A transformer transforms the GraphQL data to an Algolia record.
Each index has a name that identifies it. If the index does not exist, it will be created automatically during indexing.
Note that each record must have an ID in the key objectID. The Algolia documentation provides more information on how to structure data into records.
In this guide, the slug, field excerpt, and frontmatter field title are indexed. It will display these fields in the search results. To index more fields, add them to pageQuery with GraphQL.
Each query has optional settings. The code above tells Algolia you will want to generate “snippets” of context around your hits in the excerpt attribute.
Test your indexing
This should complete the indexing setup. Now run gatsby build. If all goes well, the output should include the following:
Check that graphql resulted in is followed by the number of pages in your project. If the number is wrong, there is something wrong with your query.
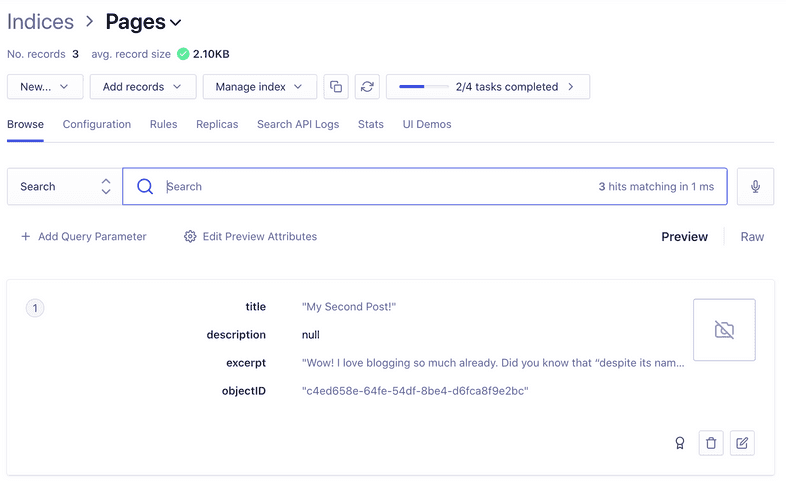
Log in to your Algolia account, go to “Indices” and then select the “Page” index and you should see your indexed page data.
Troubleshooting
If you get the error GraphQLError: Field "fileAbsolutePath" is not defined by type MarkdownRemarkFilterInput it means that no pages were found in your project. Check the path configured for gatsby-source-filesystem and the query (particularly pagePath).
Algolia has an upper bound of 10KB for an index entry. If you get the error AlgoliaSearchError: Record at the position XX objectID=xx-xx-xx-xx-xx is too big size=xxxx bytes it means you exceeded that limit. Note how the excerpts are pruned to 5000 characters in the query. Make sure you prune long fields and don’t index unnecessary data.
Adding the user interface
Now that there is data in the index, it is time to build the user interface for searching. It will display as a magnifying glass icon button that, when clicked, expands into a form field. Search results will appear in a popover below the input field as the user types.
The guide will use the following frameworks:
- React InstantSearch, a component library provided by Algolia for easily building search interfaces.
- Algolia Search provides the API client for calling Algolia.
- Styled Components for embedding the CSS in the code, integrated using the Gatsby styled component plugin.
- Styled Icons provides the magnifying glass icon for the search bar.
Styled Components can also be replaced by any other CSS solution you prefer.
Install these frameworks by running the following command:
Add the gatsby-plugin-styled-components to your gatsby-config:
Search box
The first step is to create the input field where the user enters the search query. Algolia calls this the “search box”.
The component consists of an HTML form containing an input field and the magnifying glass icon. Most of the work is done by Algolia’s connectSearchBox function. It exposes the current search string as currentRefinement and a function for changing it called refine.
Displaying search results
That’s all there is to entering the search query. Next, build a component for displaying search results:
Since Algolia supports multiple indices, the SearchResult iterates over all indices and displays hits for each of them using the HitsInIndex component. It, in turn, relies heavily on the Hits component from the InstantSearch library.
The PageHit component is responsible for displaying a single page (“hit”) in a search result.
connectStateResults wraps components to provide them with details about the current search such as the query, the number of results and timing statistics.
If you’re using Algolia’s free tier, they ask you to acknowledge the use of their technology by including the string “Powered by Algolia”, which is what PoweredBy does.
Highlight and Snippet both display attributes of matching search results to the user. The former renders the full value whereas the latter only shows a snippet. A snippet is the text immediately surrounding the match. The attribute property is the name of the key in the Algolia index (as generated by pageToAlgoliaRecord in algolia-queries.js).
Tying the search widget together
You now need to hook up the two components to each other and perform the actual search:
The ThemeProvider exports variables for the CSS to use (this is the theming functionality of styled-components). If you are using styled-components elsewhere in your project you probably want to place it at the root of your widget hierarchy rather than in the search widget itself.
The hasFocus variable tracks whether the search box is currently in focus. When it is, it should display the input field (if not, only the search icon button is visible).
The searchClient variable is memoized to avoid re-creating the Algolia search client when the Search component is re-rendered. This is important for performance, as the client caches searches to minimise the number of requests made to Algolia.
StyledSearchRoot is the root of the whole component. The React hook useClickOutside provides a callback if the user clicks anywhere else on the page, in which case it should close.
InstantSearch from react-instantsearch-dom wraps the search box and search results to orchestrate the search.
Supporting files
Almost done! Only some supporting files left. You need to add the implementation of the useClickOutside hook:
And finally, you should also add some CSS. The Styled components wrap the components you wrote earlier to add styling to them. If you wish to use a different CSS framework, you can skip these. In that case, replace StyledSearchBox with SearchBox, StyledSearchResult with SearchResult and StyledSearchRoot with <div> in index.js.
The root element needs relative positioning so you can position the popover underneath it.
The SearchBox has an open and a closed state. The hasFocus property determines which state the component is in. open and closed contain the CSS that is different for the two states.
Finally, add some styling to the search result:
Popover creates a popover floating under the search box. The show property determines whether it is visible or not.
Usage
The search widget is now ready for use. It needs to be placed somewhere in your project’s layout. If you start from Gatsby starter blog, you can use the layout component:
If you started from a different project your layout may look different; the highlighted lines show which lines need to be added.
Note that this is where you define the search indices you wish to search. They are passed as a property to Search.
Running
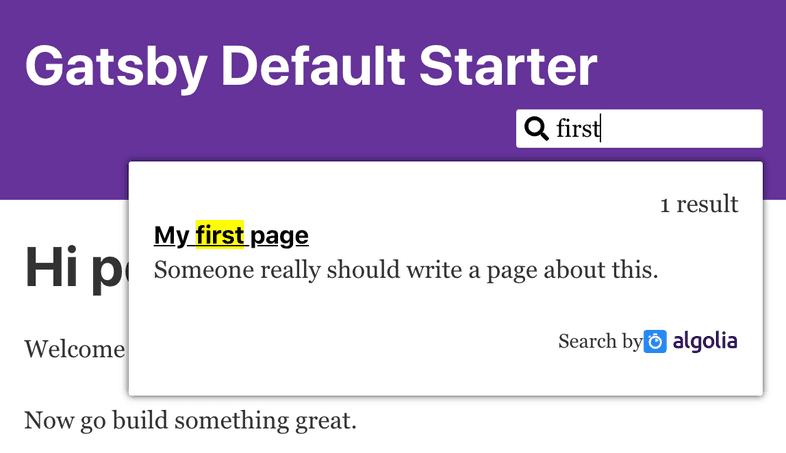
Running gatsby develop should now give you a working search that looks something like this:
You can also play around with it at https://janosh.io/blog.
Deploying to Netlify
If you try to deploy the project to Netlify, the deployment will fail with the error AlgoliaSearchError: Please provide an application ID. This is because Netlify does not have access to the Algolia configuration. Remember, it is kept in the .env file which is not checked in.
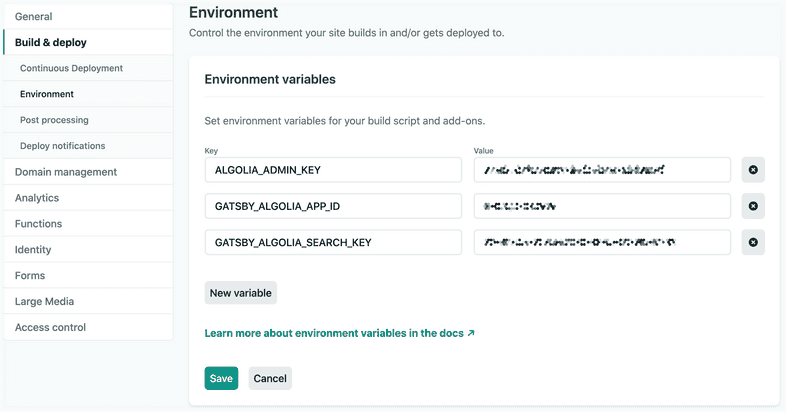
You therefore need to declare the same environment variables you put in .env in Netlify. Go to your Netlify site dashboard under Settings > Build & deploy > Environment > Environment variables and enter the keys GATSBY_ALGOLIA_APP_ID, GATSBY_ALGOLIA_SEARCH_KEY and ALGOLIA_ADMIN_KEY with the same values as you used in the .env file. After a redeploy, the search should now work!
The Netlify documentation has more information on how to configure environment variables in Netlify. Also see the Environment Variables guide for an overview of environment variables in Gatsby.
Additional Resources
If you have any issues or if you want to learn more about using Algolia for search, check out this tutorial from Jason Lengstorf:
You can also find stories of companies using Gatsby + Algolia together in the Algolia section of the blog.


